Frontend
The frontend for Edulearn uses the Jinja templating engine, with pages written in HTML/CSS.
Some components use JavaScript to enable interactivity.
Here’s a breakdown of the frontend, page-by-page:
Navbar/base
Using Jinja, we put the navbar into a ‘base.html’ template that is reused across all pages.
The navbar contains link buttons to the quiz, feedback list, and login pages.
The navbar is styled to cover the entirety of the top of the screen, and each of the links are styled a little differently:
The link to the start quiz form is styled with an orange background so it stands out
The link to the feedback list has a profile icon (in future, we plan to have individual users be able to view their own feedback)
The login link is styled plainly - black text on white (with orange text on hover)

See the html:
<!DOCTYPE html>
<html lang="en">
<head>
<meta charset="UTF-8">
<meta name="viewport" content="width=device-width, initial-scale=1.0">
<title>{% block title %}EduLearn{% endblock %}</title>
<link rel="stylesheet" href="{{ url_for('static', filename='style.css') }}">
</head>
<body>
<header>
    <div class="header-container">
    <a href="/" class="logo">Edulearn</a>
    <nav class="nav-buttons">
        <a href="/start_quiz" class="start-learning-btn">Quiz</a>
        <a href="/profile"><img src="{{ url_for('static', filename='profile.png') }}" alt="Profile" class="user-icon"></a>
        <a href="/login" class="nav-btn">Login</a>
    </nav>
    </div>
</header>

<main>
    {% block content %}{% endblock %}
</main>

{% block scripts %}{% endblock %}
</body>
</html>
Note that it looks like pretty standard HTML boilerplate, except that it includes some Jinja (usually denoted by curly braces) that allows it to work alongside other files.
Other pages will use {% extends “base.html” %} to include this template.
Front page
The front page is the first thing users will see when visiting Edulearn.

The main goal of this page is simply to push users to the meat of the website - the quiz functionality.
See below a breakdown of the three major sections:
Hero section
The front page has some blurb in a hero section, as well as linking to the start quiz form.
<section class="hero-section">
    <div class="hero-content">
        <h1>Welcome to EduLearn</h1>
        <p>Your one-stop platform for learning and testing your knowledge.</p>
        <a href="/start_quiz" class="start-learning-btn">Take a quick Quiz</a>
    </div>
</section>
Note that the link to start quiz form uses the same styling as the link within the navbar.
Feature cards
There are a couple of swanky styled cards, but the styling is a little fiddly; the feature cards are wrapped in their own dedicated ‘features-section’, ‘features-grid’ and ‘features-card’ classes.
<section class="features-section">
    <h2>Why Choose EduLearn?</h2>
    <div class="features-grid">
        <div class="feature-card">
            <div class="feature-icon">
                <img src="{{ url_for('static', filename='quiz.png') }}" alt="Interactive Quizzes" style="width: 75px; height: auto;">
            </div>
            <h3>Interactive Quizzes</h3>
            <p>Engaging challenges designed to test and reinforce your knowledge quickly.</p>
        </div>
        <div class="feature-card">
            <div class="feature-icon">
                <img src="{{ url_for('static', filename='progress.png') }}" alt="Track Progress" style="width: 65px; height: auto;">
            </div>
            <h3>Track Progress</h3>
            <p>Monitor  your performance over time and see exactly where you can improve.</p>
        </div>
    </div>
</section>
The feature cards float up a bit on hover, too:
 .feature-card:hover {
 transform: translateY(-5px);
}
Call to action
The call to action section is, essentially, a repeat of the hero section.
It has its own unique styling which makes it slightly smaller than the hero.
Start Quiz form
The start quiz form allows users to choose from 3 different quiz topics.
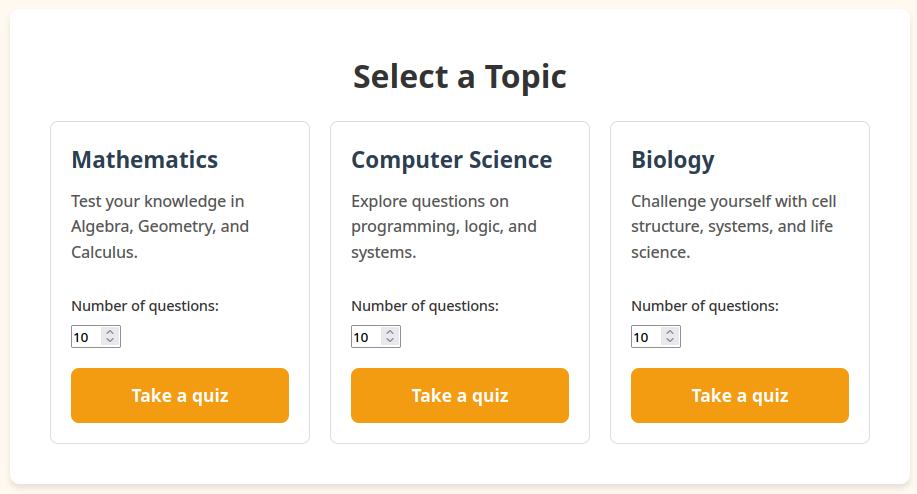
There are spinboxes that allow users to pick a value from 3-20:
<input name="limit" type="number" min="3" max="20" step="1" value="10">
These three boxes are each actually their own form; when clicked, they send the user to the quiz form, passing through the selected topic and desired number of questions.
<form action="/quiz" method="GET" class="topic-card">
  <h2>Mathematics</h2>
  <p>Test your knowledge in Algebra, Geometry, and Calculus.</p>
  <div class="topic-settings">
    <label>Number of questions:</label>
    <input name="limit" type="number" min="3" max="20" step="1" value="10">
  </div>
  <input type="hidden" name="topic" value="maths">
  <button type="submit" class="submit-btn">Take a quiz</button>
</form>
Note the form’s ‘action’ property - this causes the submission to pass through the form’s ‘limit’ and ‘topic’ values directly to the quiz form page.
Quiz form
The quiz form displays multiple-choice questions to users, showing them correct/incorrect on answer selection.
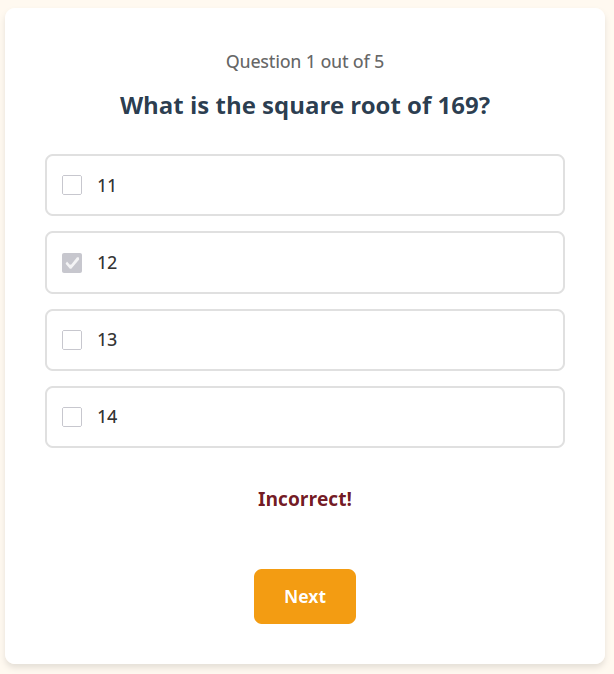
Here’s the code for the form itself:
<div class="container">
  <div class="question-box">
    {% if questions and questions|length > 0 %}
    <p id="questionCounter" class="question-counter">Question 1 out of {{ questions | length }}</p>

    {% for question in questions %}
    {% set qIndex = loop.index %}
    <div class="question" id="question{{ qIndex }}" {% if not loop.first %}style="display: none;"{% endif %}>
      <h2>{{ question.name }}</h2>
      <form class="quiz-form">
        {% for option in question.options %}
        <label class="option">
          <input type="checkbox" name="answer{{ qIndex }}" value="{{ loop.index0 }}">
          <span>{{ option }}</span>
        </label>
        {% endfor %}
      </form>
    </div>
    {% endfor %}

    <div id="feedback" class="feedback"></div>

    <div class="button-group">
      <button
        type="button"
        class="submit-btn"
        id="nextBtn"
        {% if questions|length == 1 %}style="display: none;"{% endif %}
        disabled
      >Next</button>
      <button type="button" class="submit-btn" id="finishBtn" style="display: none;">Finish</button>
    </div>
    {% else %}
    <article class="feedback-card">
      <p>{{ error or 'No questions to show.' }}</p>
    </article>
    {% endif %}
  </div>

</div>
Syntax highlighting for this code block is Jinja only, but it does help show how Jinja affords us the flexibility to dynamically render multiple form options based on provided data.
The basic way to think of it is: this form takes a set of questions, which each contain a set of options.
Jinja allows us to iterate over these bits of data and dynamically populate our form with it.
The form also displays a fallback error message if there is no question data provided.
The form itself expects to have all of the question data provided when it is loaded, it’s not fetching back and forth multiple times in 1 quiz.
You may still be confused on what we’re doing with this empty ‘feedback’ div and the two submit buttons.
This is where our JavaScript comes in:
Quiz form JS
We have some functions relating to the form that let us play around with the form without having to leave the page.
showQuestion
We have a showQuestion function that gets called when the Next question button is clicked, and on form initialisation.
We start by sanitising the input question number, checking it isn’t a bool and that it’s a number between 1 and the quiz length:
function showQuestion(questionNumber) {
  if (typeof questionNumber === 'boolean') {
    return;
  }

  const parsedQuestionNumber = Number(questionNumber);
  if (!Number.isInteger(parsedQuestionNumber)) {
    return;
  }

  if (parsedQuestionNumber < 1 || parsedQuestionNumber > totalQuestions) {
    return;
  }
For our given number, we show the relevant data, update question number, clear our correct/incorrect feedback and disable our next/finish button as necessary:
  for (let i = 1; i <= totalQuestions; i++) {
    document.getElementById(`question${i}`).style.display = 'none';
  }

  document.getElementById(`question${parsedQuestionNumber}`).style.display = 'block';

  document.getElementById('questionCounter').textContent = `Question ${parsedQuestionNumber} out of ${totalQuestions}`;

  document.getElementById('nextBtn').style.display = parsedQuestionNumber < totalQuestions ? 'inline-block' : 'none';
  document.getElementById('nextBtn').disabled = true;
  document.getElementById('finishBtn').style.display = 'none';

  document.getElementById('feedback').textContent = '';
  document.getElementById('feedback').className = 'feedback';
}
Answer selection event
Last but not least, our answer selection event:
// Enforce single-select behaviour and check answer on selection
document.querySelectorAll('input[type="checkbox"]').forEach(checkbox => {
  checkbox.addEventListener('change', function() {
    const feedback = document.getElementById('feedback');

    if (this.checked) {
      document.querySelectorAll(`input[name="${this.name}"]`).forEach(cb => {
        if (cb !== this) cb.checked = false;
        cb.disabled = true;
      });

      const correctOption = questions[currentQuestion - 1].correctOption;
      if (parseInt(this.value) === correctOption) {
        feedback.textContent = 'Correct!';
        feedback.className = 'feedback correct';
      } else {
        feedback.textContent = 'Incorrect!';
        feedback.className = 'feedback incorrect';
      }

      if (currentQuestion < totalQuestions) {
        document.getElementById('nextBtn').disabled = false;
      } else {
        document.getElementById('finishBtn').style.display = 'inline-block';
      }

      userAnswers[currentQuestion - 1] = {
        qID: questions[currentQuestion - 1].id,
        selected: parseInt(this.value),
        isCorrect: parseInt(this.value, 10) === questions[currentQuestion - 1].correctOption
      }

    } else {
      feedback.textContent = '';
      feedback.className = 'feedback';
    }
  });
});
This will fire on any answer selection.
Basically, it will:
ensure that only one answer is selected (disable other options)
update feedback to display correct/incorrect
unlock next/finish button as appropriate
store user answer (to send to backend on finish)
if, somehow, the user has unchecked an answer, wipe feedback
Styling
All the style for the quiz template:
We start with the box that the entire question is held in, with styling for question title, question number, etc.
.question-box {
    background-color: white;
    padding: 40px;
    border-radius: 10px;
    box-shadow: 0 4px 6px rgba(0, 0, 0, 0.1);
    max-width: 600px;
    width: 100%;
}

.question-box.wide {
    max-width: 900px;
}

.question-box h1 {
    text-align: center;
    margin-bottom: 20px;
}

.question-box h2 {
    color: #2c3e50;
    margin-bottom: 30px;
    font-size: 1.5rem;
}

.question-counter {
    text-align: center;
    color: #666;
    margin-bottom: 10px;
}

.quiz-form {
    display: flex;
    flex-direction: column;
    gap: 15px;
    text-align: left;
}
Continuing onto styles for the checkbox buttons.
The interactible buttons change colour on hover and explicitly set the cursor to pointer, which helps indicate that they’re interactible.
The buttons also flex wide to fit the form box, giving the user plenty of room to click.
.option {
    display: flex;
    align-items: center;
    padding: 15px;
    border: 2px solid #e0e0e0;
    border-radius: 8px;
    cursor: pointer;
    transition: all 0.3s;
}

.option:hover {
    border-color: #f39c12;
    background-color: #fef5e7;
}

.option input[type="checkbox"] {
    width: 20px;
    height: 20px;
    margin-right: 15px;
    cursor: pointer;
}

.option span {
    font-size: 1.1rem;
    color: #333;
}
Style for question correct/incorrect feedback.
Short and sweet - green/red for correct/incorrect, style applied by checkbox JS.
.feedback {
    margin-top: 20px;
    padding: 15px;
    font-size: 1.2rem;
    font-weight: 600;
    text-align: center;
}

.feedback.correct {
    color: #155724;
}

.feedback.incorrect {
    color: #721c24;
}
Everything follows the same off-white background + orange accent as the rest of the design.
Feedback list
This page gives a summary of previously completed quizzes, with topic name and correct/incorrect answer counts.

The main section of code for the quiz feedback list view:
<h1>Quiz Feedback</h1>
<p>Recent quizzes and their scores.</p>

<section class="module-grid">
  {% if quizzes and quizzes|length > 0 %}
    {% for quiz in quizzes %}
    <article class="module-card">
      <h3>{{ quiz.topic|title }}</h3>
      <p><strong>Total Questions:</strong> {{ quiz.total_questions }}</p>
      <p><strong>Questions Correct:</strong> {{ quiz.correct_count }}/{{ quiz.total_questions }}</p>
      <p><strong>% Score:</strong> {{ quiz.score_percent|int }}%</p>
      <a href="/quiz_feedback?feed_id={{ quiz.feed_id }}" class="start-learning-btn">View Feedback</a>
    </article>
    {% endfor %}
  {% else %}
    <article class="module-card">
      <h3>No completed quizzes yet</h3>
      <p>Finish a quiz to see feedback here.</p>
    </article>
  {% endif %}
</section>
Like the quiz form, this page expects to have the feedback data provided to it when it is loaded.
This page leans heavily on Jinja to dynamically display data within the template, and have a fallback error display if there is none.
The view feedback button will take the user directly to the feedback detail view for that particular feedback object.
Much of the styling is re-used from the start quiz form.
Feedback detail view
This page gives a question-by-question breakdown of how users performed on previous quizzes.
See the code:
<section class="feedback-list">
            <h1>Quiz Feedback Detail</h1>

            {% if error %}
                    <article class="module-card">
                            <p>{{ error }}</p>
                    </article>
            {% elif summary %}
                    <p>
                            Topic: {{ summary.topic|title }} |
                            Total Questions: {{ summary.total_questions }} |
                            Questions Correct: {{ summary.correct_count }}/{{ summary.total_questions }} |
                            Score: {{ summary.score_percent|int }}%
                    </p>

                    {% for row in questions %}
                            {% set options = [row.option_1, row.option_2, row.option_3, row.option_4] %}
                            <article class="module-card">
                                    <h3>Question {{ loop.index }}</h3>
                                    <p><strong>Question:</strong> {{ row.question_text }}</p>
                                    <p><strong>Your answer:</strong> {{ options[row.user_answer_index] }}</p>
                                    <p><strong>Correct answer:</strong> {{ options[row.correct_answer_index] }}</p>
                                    <p><strong>Result:</strong> {{ 'Correct' if row.is_correct else 'Incorrect' }}</p>
                            </article>
                    {% endfor %}
            {% else %}
                    <article class="module-card">
                            <p>No feedback data to display.</p>
                    </article>
            {% endif %}

            <p>
                    <a href="/profile" class="start-learning-btn">Back to Quiz feedback</a>
            </p>
    </section>
Again, we rely heavily on Jinja here to work with the data the page loads in with.
We provide an overview of the performance on this quiz, with correct answers vs incorrect answers and a percentage of correct answers.
We reuse the module cards again to display question-by-question feedback, including:
question title (e.g ‘What is 2+2?’)
user selected answer
correct answer
correct/incorrect result for question
Login form
In future, we plan to implement a login form.
For now, this page simply displays a placeholder form, with some plain HTML text entry boxes.